Hi everyone, Erica here from 5 Little Monsters sharing another Geek-Craft with you. For a while now I have been wanting to try making a crocheted Lightsaber. I really wanted to try to make it last month before the new movie came out and before Christmas but that is such a busy time of year that it just didn’t happen. I still really wanted to try it though, so a month later here it is.
I wanted to make it sort of small, like a soft toy Lightsaber for babies or little kids. I thought it might be kind of fun as part of a baby gift, maybe a little Star Wars shirt paired with babies first Lightsaber.
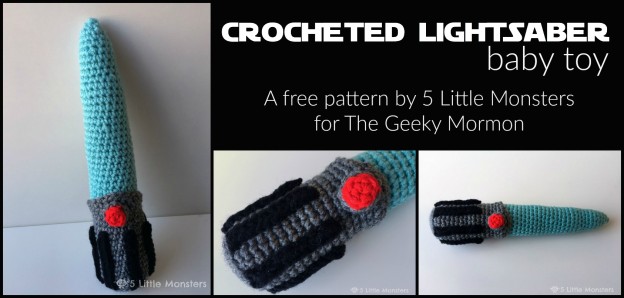
The finished Lightsaber is about 11 inches long and 2 inches in diameter across the bottom of handle (the widest part). I used light blue yarn for the blade and tried to style the handle after Anakin/Luke/Rey’s Lightsaber. I added black strips to the handle after it was stuffed as well as a red and gray circle button. One side of the top of the handle is curved up so that it is a little bit taller than the other side. In order to make it so that the blade looks like it is coming up out of the handle I left a ridge of back loops inside of the handle and worked the blade into those loops.
Crocheted Lightsaber
You will need:
- G crochet hook
- gray medium weight yarn (I used Red Heart Super Saver Heather Gray)
- light blue medium weight yarn (I used Red Heart With Love Iced Aqua)
- Small amount of black and red medium weight yarn (I used Red Heart Super Saver for both)
- yarn needle
- scissors
Instructions:
Handle:
with gray yarn
Round 1: in magic ring, ch 1, 6 sc (6 sc)
Round 2: 2 sc in each stitch (12 sc)
Round 3: [2 sc in first stitch, 1 sc in next] around (18 sc)
Round 4: [2 sc in first stitch, 1 sc in next 2 stitches] around (24 sc)
Round 5: 1 sc in lo of each stitch around (24 sc)
Round 6-18: 1 sc in each stitch (24 sc)
Round 19: 1 sc in flo of each stitch, this will create a ridge of loops inside of the handle where you will work the first row of the blade (24 sc)
Round 20: 1 sc in next 12 stitches, slip stitch in next stitch (12 sc)
Round 21: turn, skip slip stitch just worked, slip stitch in next 2 stitches, sc in next 8 stitches, slip stitch in next (8 sc)
Round 22: turn, skip slip stitch just worked, slip stitch in next 2 stitches, sc in next 4 stitches, slip stitch in next (4 sc)
Cut yarn and finish off
Blade:
with blue yarn, stuff as you go
Round 1: this round will be worked in the back loops left inside of the handle in Round 19 of the handle, [1 sc in first 4 loops, sc2tog] 4 times (20 sc)
Rounds 2-21: 1 sc in each stitch around (20 sc)
Round 22: [1 sc in first 3 stitches, sc2tog] 4 times (16 sc)
Rounds 23-26: 1 sc in each stitch around (16 sc)
Round 27: [1sc in first 2 stitches, sc2tog] 4 times (12 sc)
Rounds 28-29: 1 sc in each stitch around (12 sc)
Round 30: [1 sc in first stitch, sc2tog] 4 times (8 sc)
Round 31: sc2tog 4 times (4 sc)
Cut yarn, finish off, weave in ends
Handle Stripes:
with black yarn, make 7
ch 11, sc in 2nd ch from hook and each ch to the end (10 sc)
cut yarn leaving long end for sewing
Button:
with gray yarn
in magic ring, ch 2, 8 hdc, join to first hdc with slip stitch
cut yarn leaving long end for sewing
with red yarn
in magic ring, ch 1, 6 sc, join to first sc with slip stitch
cut yarn leaving long end for sewing
Sew stripes and buttons to the handle. The stripes should line up along the bottom of the handle and be evenly spaced around. For the button first sew the gray circle onto the top part of the handle that curves up, then sew the red circle on top of the gray circle.
Now you have a little stuffed Lightsaber, perfect for babies or small children. Because it is stuffed and made from yarn it is nice and soft so you don’t have to worry about them hurting people with it and it is small enough for them to play with easily. The stripes on the handle give a little extra texture for them to play with. If you wanted to make it longer for older kids you could probably just add extra straight rows in between the decreases on the blade. I don’t know how well it will stay straight if you make it longer. I was worried it might be a little bit floppy and although you could add a dowel or something to the center to help keep it straight I thought that might take away from the soft, less likely to hurt someone, part.
I hope you enjoy this pattern, I will be back soon with another Geek-Craft to share


